

Table of Contents
- Renter-Friendly Hanging Solutions: The Damage-Free Toolkit
- Check Your Tenancy Agreement Before You Hang Art
- Surface-Specific Advice for Rental Walls
- How to Repair Picture Hook Holes in Plaster
- Weight Capacity Testing for Rental Hanging
- Gallery Wall Layout Guide for Renters
- Conclusion: Hang Your Art, Keep Your Deposit
- Frequently Asked Questions
Last Updated: September 8, 2026
Renting a home often means living with blank walls. The fear of losing your security deposit over a few picture hooks keeps many spaces feeling temporary and impersonal. You can display art you love without leaving a trace, but it requires more than just buying a pack of adhesive strips. Below, we show you how to hang art confidently, navigate your tenancy agreement, and keep your deposit safe with practical, surface-specific methods.
The core principle of renter-friendly decor is reversibility. Every hanging method you choose should be fully removable, leaving no nail holes, scuffs, or adhesive residue behind.
Renter-Friendly Hanging Solutions: The Damage-Free Toolkit
The best approach to hanging art in rentals is to build a toolkit of damage-free solutions before you pick up a hammer. Adhesive strips and picture hanging hooks are the foundation, but they only work when applied to the right surface and in the correct way.
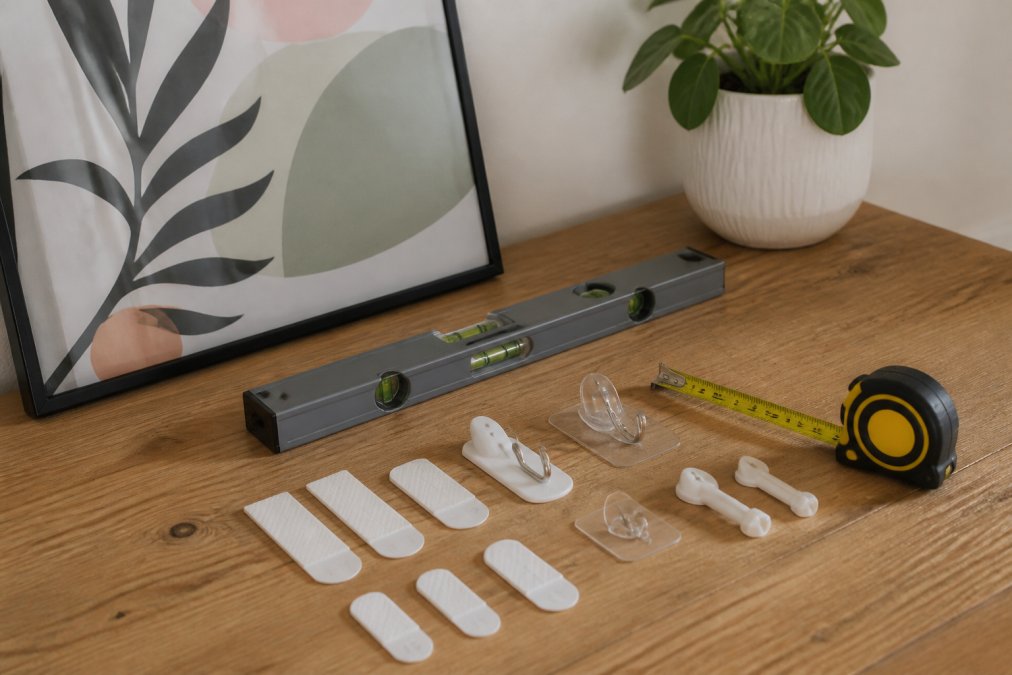
Your starter kit should include:
- Adhesive strips for lightweight framed prints and posters
- Picture hanging hooks with a higher weight limit for medium-sized frames
- A spirit level to ensure your gallery wall stays straight
- Isopropyl alcohol and a clean cloth for surface preparation
- Floating shelves or picture ledges for swapping art without any fixing at all
A common mistake is assuming one adhesive product works on every wall. Paint finish, texture, and age all affect how well the adhesive bonds. Preparing the surface with isopropyl alcohol removes dust and grease, which is the difference between a strip that holds for years and one that peels off overnight.
Check Your Tenancy Agreement Before You Hang Art
Before you reach for any mounting hardware, read your tenancy agreement carefully. Many agreements include a clause about alterations, and some landlords require written permission before you make any holes, even small ones. The distinction usually comes down to "minor damage" versus "alterations." Picture hook holes from a single nail are often considered fair wear and tear, but this is not guaranteed.
To protect your deposit, run through this checklist of lease clauses and phrases before hanging anything:
- "Alterations" or "Structural Changes" clause, This is the most common clause that restricts drilling or fixing items to walls. If your agreement says "no alterations without written consent," a nail hole could technically breach it. Ask for permission in writing, even for adhesive strips.
- "Decoration" clause, Some agreements prohibit repainting or redecorating. This matters because if you need to touch up paint after removing art, you may be in breach. Check whether the clause covers the entire property or only specific rooms.
- "Fair Wear and Tear" definition, Landlords can only deduct for damage beyond fair wear and tear. Small pinholes from a single picture hook are often considered fair wear and tear, but multiple holes or large fixings are not. Government-approved schemes publish guidance on what constitutes fair wear and tear, check their dispute resolution pages for examples.
- "Inventory and Schedule of Condition", Before you hang anything, photograph every wall you plan to use. This document is your evidence if a landlord claims pre-existing marks were caused by you.
- "Professional Cleaning" clause, This rarely relates to walls, but if your agreement demands professional cleaning at the end of the tenancy, it may also imply a higher standard of wall condition. Factor that into your risk assessment.
If your agreement is silent on wall fixings, ask your landlord or property manager for permission in writing. A quick email explaining that you will use removable adhesive and repair any minor marks on departure is usually enough to get approval. Keep the response, it is your proof of consent if a dispute arises later.
For more guidance on your rights and responsibilities regarding deposits and property condition, consult the official guidance on tenancy deposits from GOV.UK. Understanding the legal framework helps you negotiate from a position of knowledge.
Surface-Specific Advice for Rental Walls
The type of wall you are working with determines which hanging method is safe. Flat, smooth painted plaster is ideal for adhesive strips, but many rental properties have textured walls, wallpaper, or older plaster that reacts differently.
For smooth painted walls, adhesive strips and hooks are your best option. For wallpaper, avoid adhesive strips entirely, as they can tear the paper when removed; instead, lean art against the wall on a shelf or mantle. For older plaster walls prone to crumbling, a small picture hook with a nail is often safer than adhesive, because the adhesive can pull off a layer of paint.
Textured walls present a unique challenge because adhesive strips need a smooth contact area to bond properly. If your wall has a heavy texture, your options are limited to leaning art or using a picture rail. Many period properties have original picture rails, designed to support art without any wall damage. You can hang wire from the rail using purpose-built hooks, keeping the wall itself completely untouched.
How to Repair Picture Hook Holes in Plaster
Even with careful planning, accidents happen. A nail slips, or you decide to rearrange and find a hole that needs filling. Knowing how to repair picture hook holes in plaster is an essential skill for any renter who wants their deposit back.
The repair process is straightforward and takes about an hour including drying time:
- Remove the nail or hook and clean away any loose plaster dust.
- Fill the hole with a small amount of spackle or filler using a putty knife.
- Allow the filler to dry completely, then sand it smooth with fine-grit sandpaper.
- Touch up the area with matching paint.
The key is matching the paint finish. Most rental walls are painted in a matte or silk emulsion, but the exact shade can vary. If you do not have the original paint, take a small chip to a DIY store for a colour match.
Removing Adhesive Strips Without Peeling Paint
The more common deposit risk is not nail holes, it is adhesive residue and peeled paint from strips removed incorrectly. Most manufacturers instruct you to stretch the strip horizontally along the wall rather than pulling it outward. This "stretch and release" method breaks the adhesive bond without stressing the paint layer.
Follow this step-by-step removal process to minimise damage:
- Wait for the right conditions, Adhesive bonds weaken in warmth (acs.org). If possible, remove strips on a warm day or after running a hairdryer over the strip for 30 seconds at a low heat setting. Do not overheat, you risk damaging the paint.
- Locate the release tab, Most branded strips have a small tab at the bottom. If you cannot find it, gently lift a corner with a plastic scraper or your fingernail. Never use a metal blade, which will gouge the plaster.
- Pull downwards, not outwards, Grasp the tab and pull it straight down toward the floor, keeping the strip parallel to the wall. The strip should stretch and release from the wall in one piece. If it snaps, repeat the process with the remaining section.
- Deal with residue, If any adhesive remains, roll it off with your fingertip, the adhesive balls up and lifts away. Do not use water, which can drive the adhesive deeper into the paint. For stubborn residue, use a small amount of isopropyl alcohol on a cotton bud and dab, rather than rub, the area.
- Assess the paint, If a small patch of paint has lifted, you have two options. For a patch smaller than a 5p coin, touch it up with matching emulsion (royalmint.com). For larger areas, you may need to repaint the entire wall section. Feather the edges of the new paint into the old to avoid a visible line.
When the Wall Needs More Than a Touch-Up
If removal has left a rough patch where the paint has blistered or the plaster surface has torn, treat it like a small hole:
- Sand the affected area lightly with fine-grit sandpaper to remove loose paint flakes.
- Apply a thin coat of plaster filler with a putty knife, feathering the edges.
- Sand smooth once dry, then prime the patch with a universal primer before painting.
- Match the paint finish, most rental walls use a vinyl matt emulsion, which is easy to colour-match at any major DIY retailer.
Weight Capacity Testing for Rental Hanging
The most common cause of fallen art is exceeding the weight limit of the adhesive product. Every pack states a maximum weight, but that figure assumes ideal conditions: a smooth, clean, primed wall. In practice, halve the stated limit to account for paint quality and surface variations.
Before committing to a final placement, test the hold. Apply the strip or hook and attach your frame, then leave it for 24 hours. After that period, check that the frame has not shifted. A simple tug test will tell you if the bond is secure.
For heavier pieces, consider alternatives that do not rely on adhesive at all. Picture ledges and floating shelves distribute weight across a horizontal surface and allow you to lean frames without any wall fixings. This approach creates zero damage and makes swapping art effortless.
Gallery Wall Layout Guide for Renters
Creating a gallery wall in a rental is about planning the layout before you make any marks. The goal is a cohesive arrangement that looks intentional, not a scattering of frames that grew organically.
Start by selecting your frames and laying them out on the floor. Arrange them in a configuration that suits your space, whether a symmetrical grid or an organic cluster. Once happy with the floor layout, trace each frame onto a large sheet of paper, cut out the shapes, and tape them to the wall with painter's tape. This lets you adjust spacing and alignment without committing to holes.
For a cohesive look, keep a consistent gap of around 5 to 8 centimetres between frames. Mixing frame styles can work, but tying them together with a common colour or material creates a more polished result. If using adhesive strips, mark the exact position of each strip on your paper template, so you know precisely where to press the adhesive onto the wall.
If you are working with a limited number of pieces, leaning art on a mantle, shelf, or sideboard is a stylish, zero-damage alternative. This works particularly well with digital downloads that you can print in various sizes and swap out seasonally.
Conclusion: Hang Your Art, Keep Your Deposit
Hanging art in rentals does not have to mean choosing between a personal space and your financial security. With the right toolkit, a quick check of your tenancy agreement, and careful surface preparation, you can create a home that reflects your personality without causing damage.
The real limitation for most renters is not the walls, it is the fear of commitment to a piece of art. This is where digital downloads shine. We offer affordable, instant art prints that let you experiment with your space without the expense of a framed original. Try a bold new piece, see how it feels in your room, and swap it out when your mood changes. Make your rental walls tell your story, while keeping your deposit safe.
Frequently Asked Questions
Are tenants allowed to hang pictures in the UK?
In the UK, your tenancy agreement dictates the rules. Many agreements allow hanging pictures with small nails or adhesive strips, but some prohibit any wall fixings. Always check your contract first. If it is silent on the matter, reasonable use is often accepted, but seeking landlord permission in writing is the safest route. Unapproved damage beyond fair wear and tear could lead to deductions from your security deposit.
What are the best adhesive strips for hanging art in rentals?
Look for adhesive strips designed for hanging, such as Command strips. They are a popular damage-free hanging solution for lightweight frames. Check the pack's weight limit and follow the surface preparation instructions exactly. Clean the wall with isopropyl alcohol, press firmly for 30 seconds, and wait an hour before hanging. Remove them by stretching the strip downwards slowly to avoid wall damage.
How do I repair small nail holes before moving out?
To repair picture hook holes in plaster, remove the nail and fill the hole with a small amount of spackle or polyfilla. Use your finger or a putty knife to press it in and level it with the wall. Once dry, sand it smooth with fine-grit sandpaper. For stubborn marks, touch up with matching paint. This simple step prevents deposit deductions for wall damage.
Can I use adhesive strips on wallpapered rental walls?
Using adhesive strips on wallpaper is risky. They can tear the paper or leave a residue when removed, leading to damage. Instead, consider leaning art against the wall on a shelf or mantle, or using a picture rail if your property has one. These methods keep your wallpaper intact and your security deposit safe.